Building Agentic Apps on Microsoft Azure
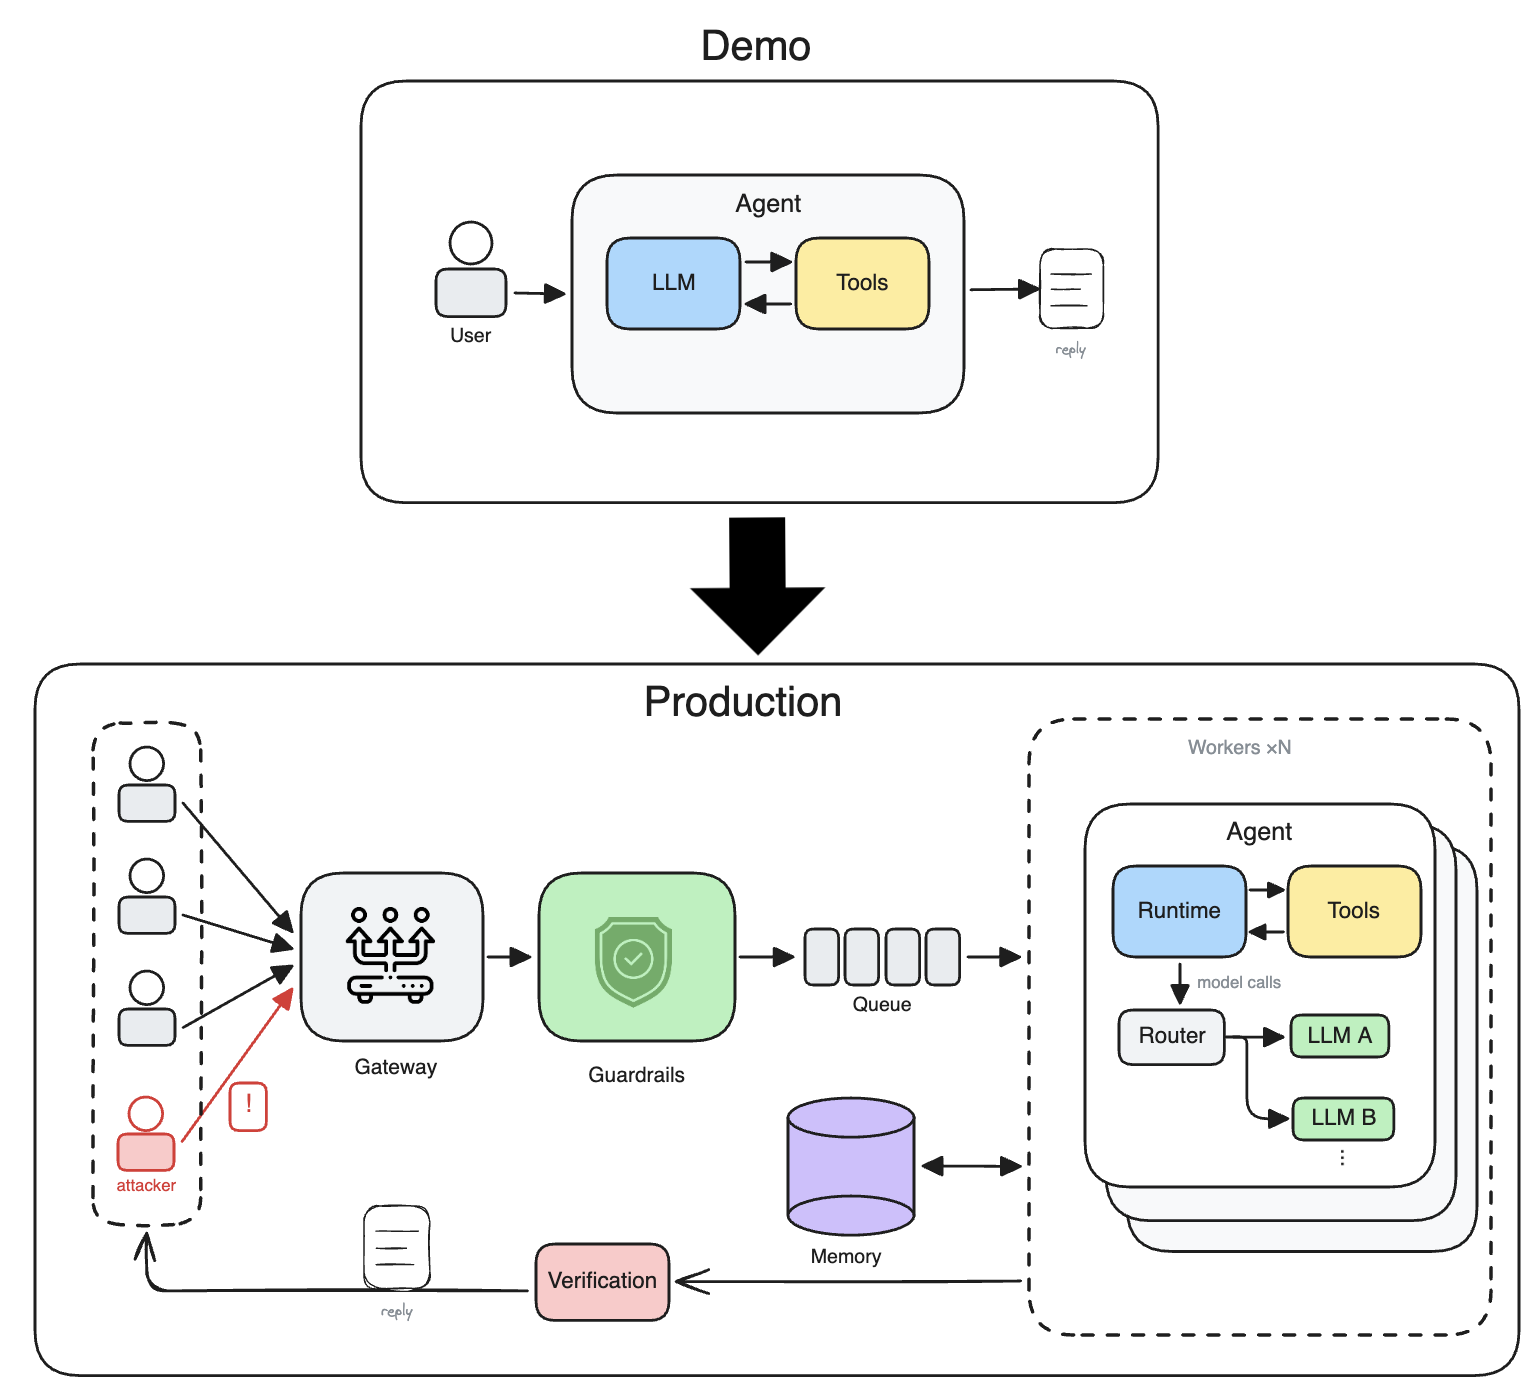
If you have built an agent demo recently, you have noticed how fast you can build a working agent in just a few days. Suppose you've built an agent that triages incoming support tickets. It takes a ticket as input, then, based on internal docs, it either drafts a reply or escalates the issue to a real human. When you test the agent on thirty tickets from the last day, the replies look quite reasonable.
But thirty tickets is too small a sample to prove the agent is ready for production. In production, a ticket may contain a prompt injection, which is text written to make the agent ignore your instructions and follow the attacker's instructions instead. If none of your thirty tickets contained a ticket with prompt injection, then your agent may not be able to robustly handle it.
In practice, teams and AI labs put a lot of engineering effort turning a demo into a reliable production system. In this article, we follow the triage agent example and look at what breaks in a prototype, why it breaks, and how teams fix it. Throughout the article, we'll see how Azure provides a ready-made piece for each of these problems.
What Is an LLM Agent?
Before we get into what breaks in an agentic system, let's understand the components of an LLM agent.
An agent has two parts: an LLM and a harness. The LLM decides what to do at each step to complete the task. The harness is the code around the LLM that handles everything else, like putting the LLM in a loop, executing the tools, and holding the required credentials for tool calls.
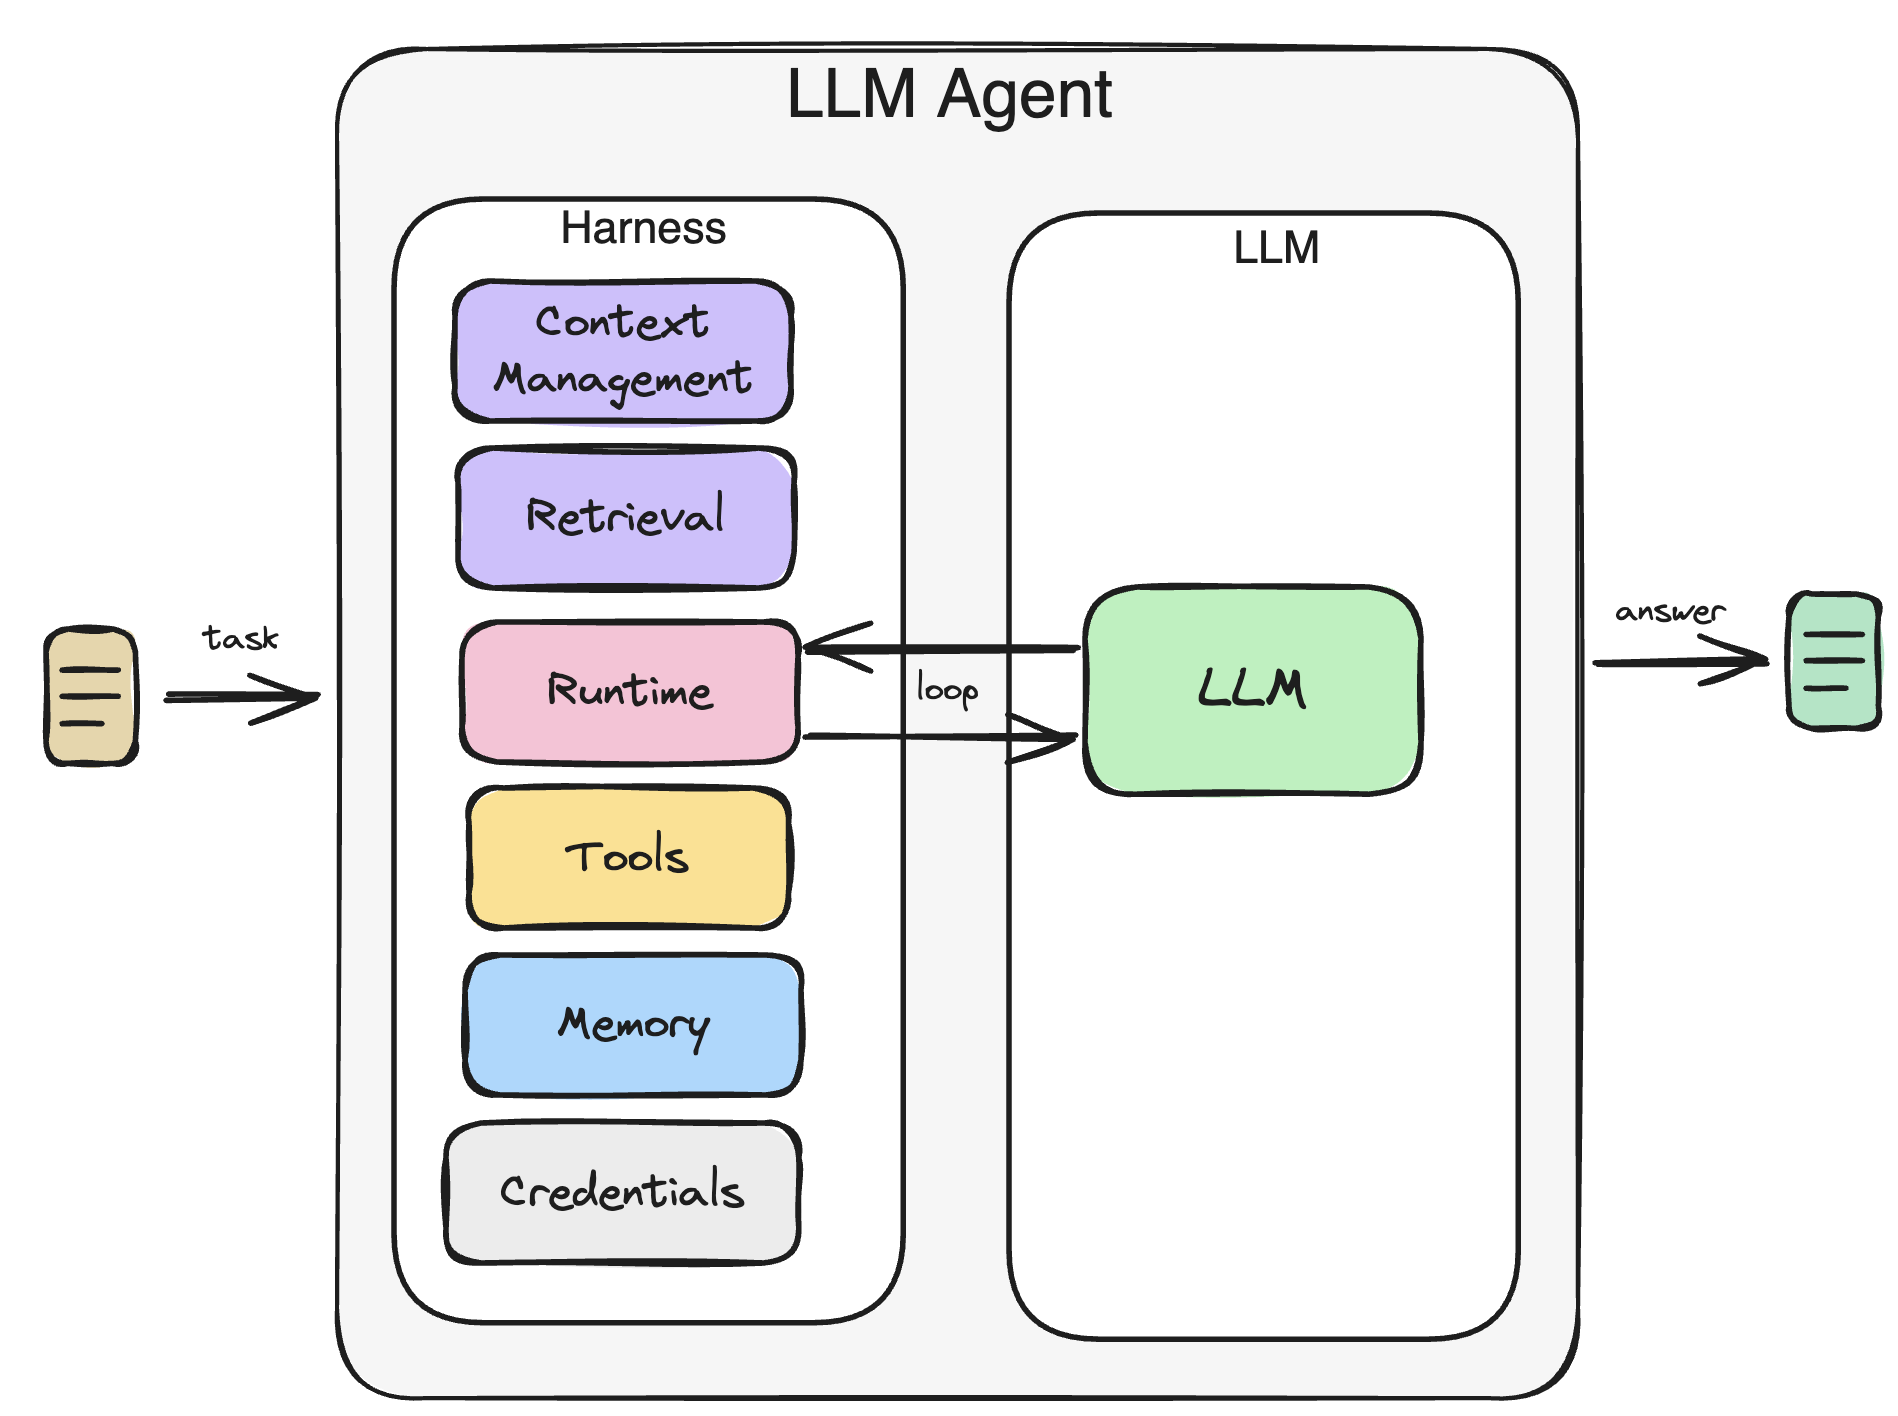
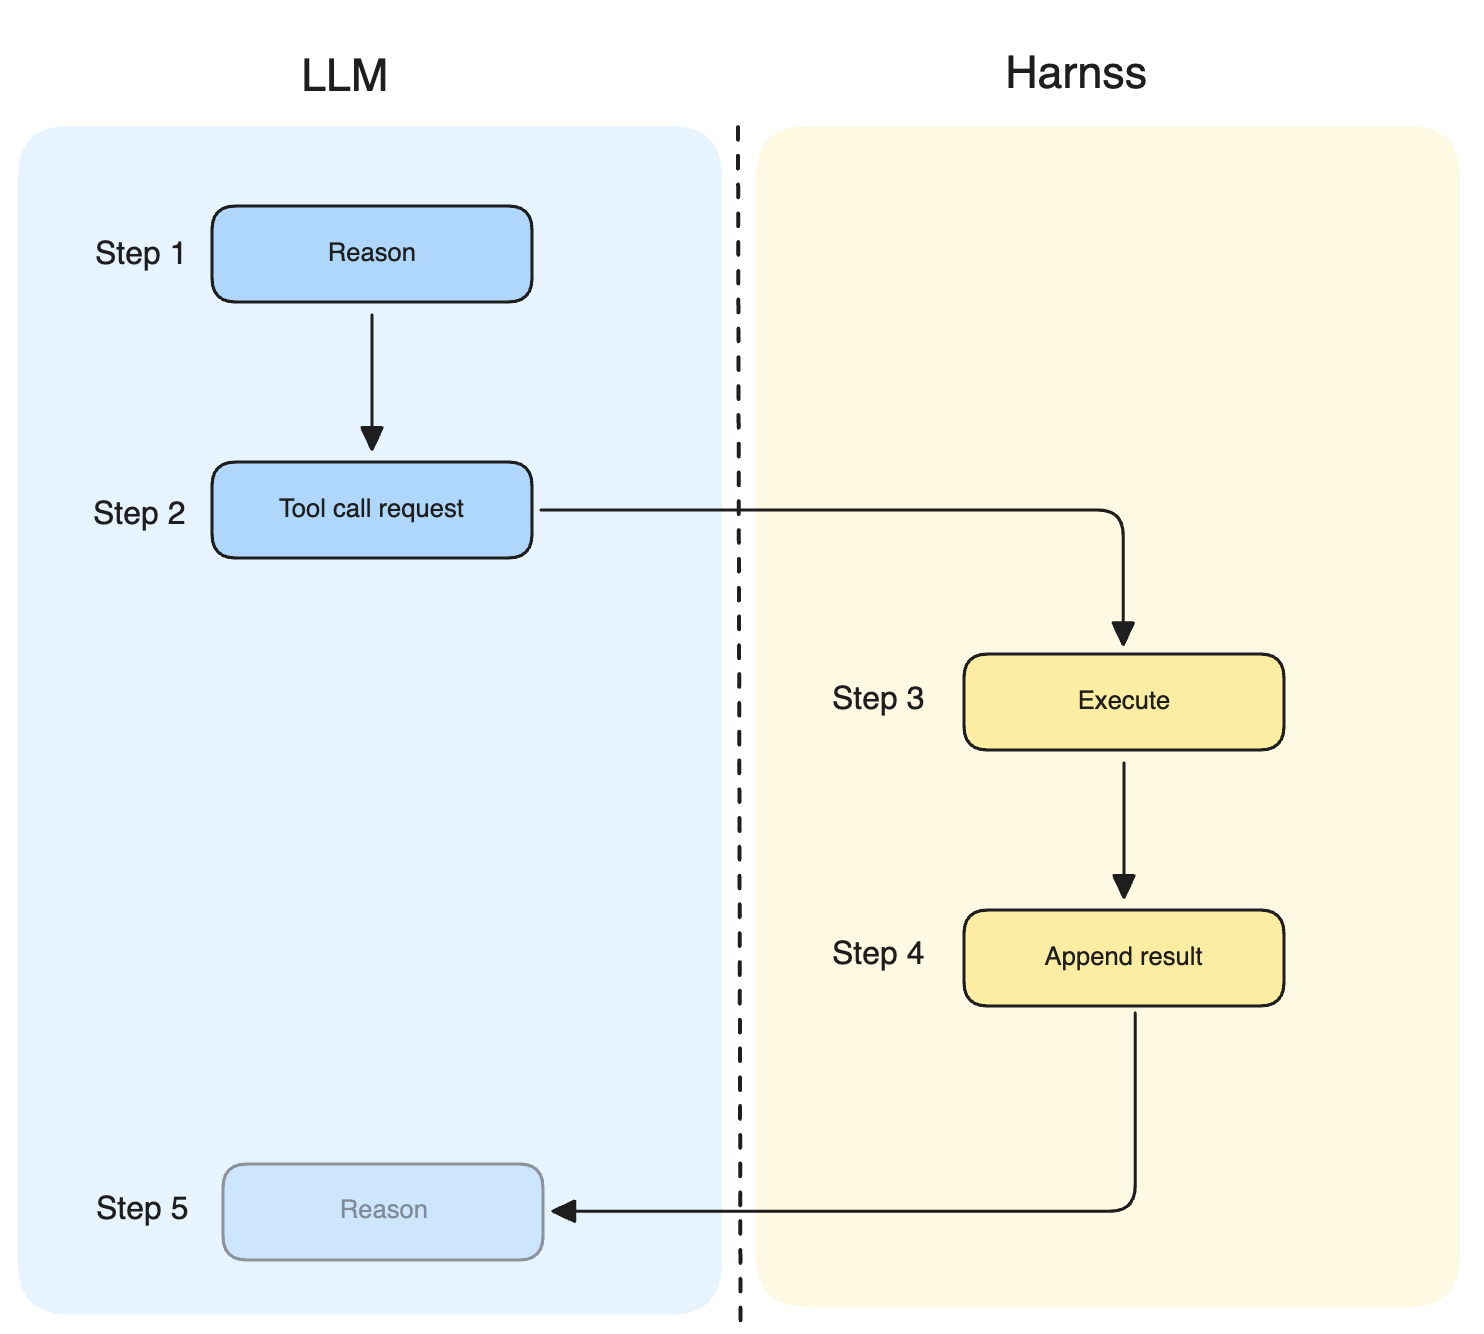
The loop is the core of the agent. The following steps repeat until the LLM decides to produce a final answer:
- The LLM reasons over the current prompt
- The LLM generates a tool call request
- The harness executes the tool
- The harness appends the result of the tool call to the conversation
- The harness sends the updated prompt back to the LLM
Note that the LLM never executes a tool itself. The LLM simply sees the tool description in its prompt. It is the harness that controls the execution. In a prototype, the harness is typically simple and doesn't do anything major. It uses the best available LLM, puts it in a loop, and simply executes tools when the LLM emits a tool call. In production, the harness must handle more. For example, it should decide which LLM to use and when, ensure the tools are executed safely, and ensure production traffic is handled robustly. Let's go over each of these, starting with the choice of model.
Which Model Goes Inside the Loop?
In a prototype, the engineer typically picks a capable model, possibly with its maximum reasoning effort, and then pastes its deployment name into their code. This is fine in a demo because they can quickly check if their idea works or not. But in production, it is not an optimal call.
When an agent is handling a request, the steps have different levels of difficulties. In one step, the agent may need to decide if a ticket is about billing or technical. This is a simple task that most small models can handle. But what if the agent needs to draft a reply to an unhappy enterprise customer? This is no longer a simple task.
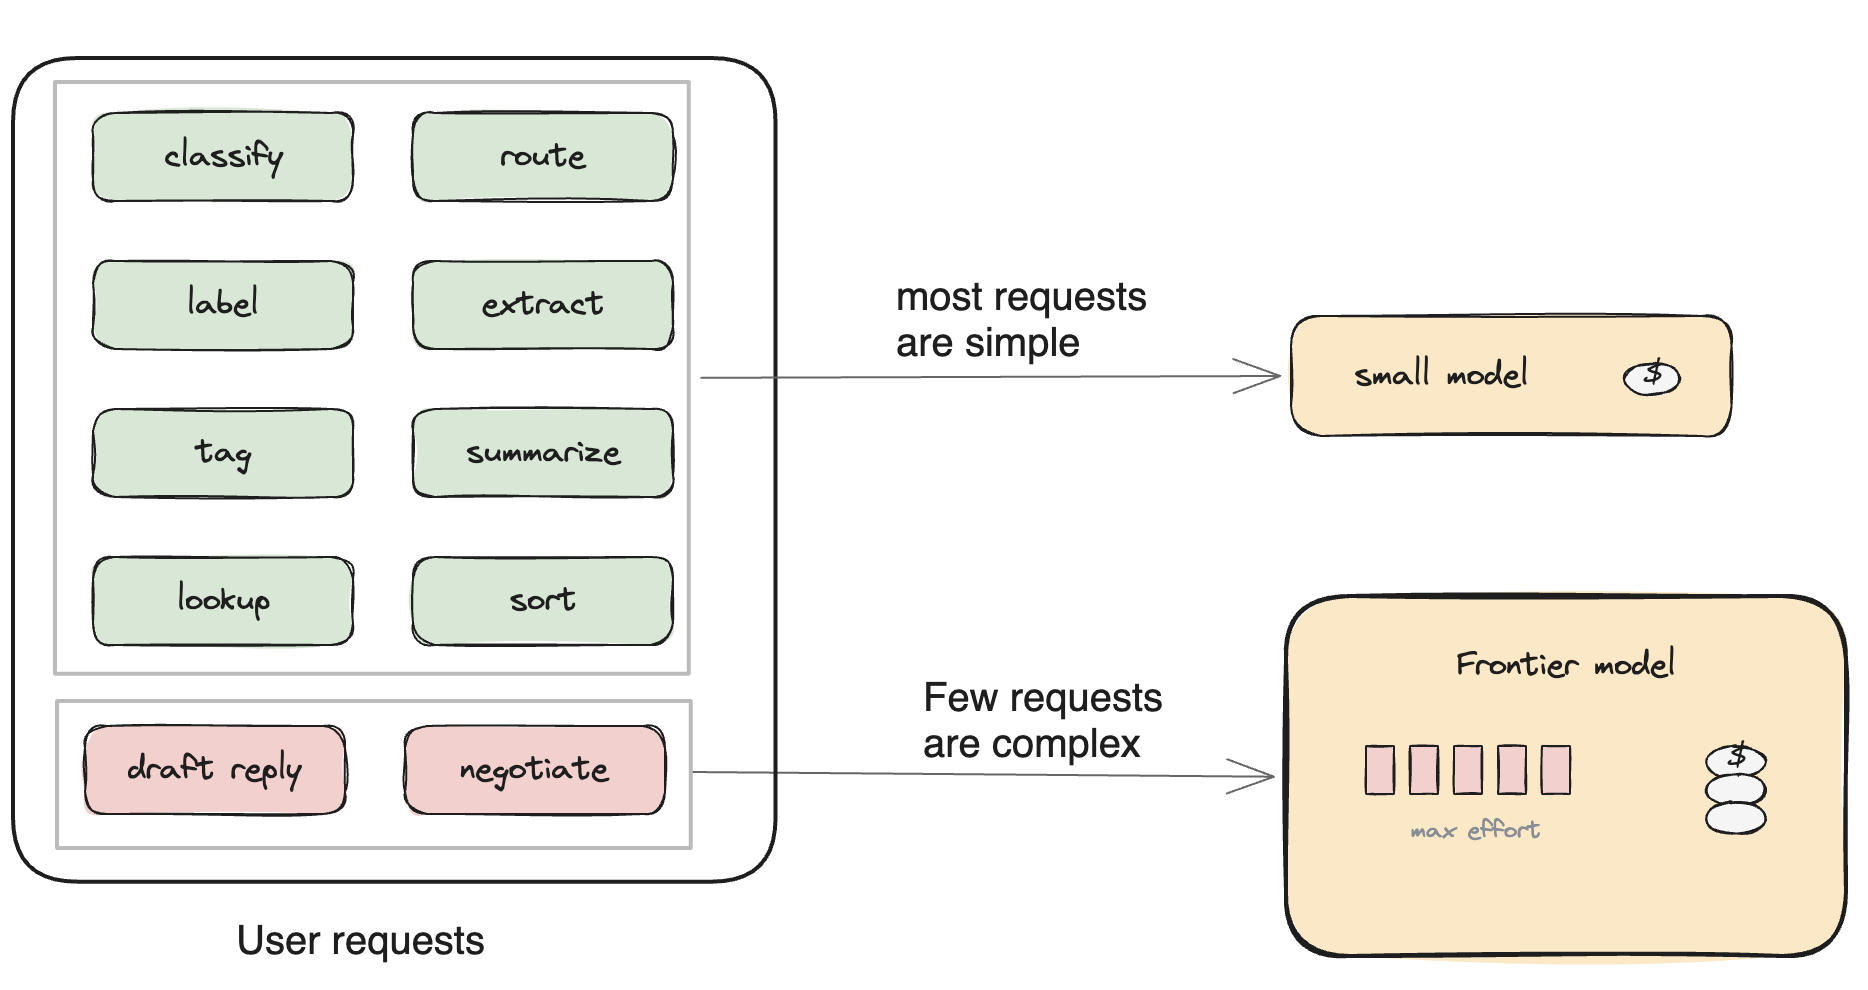
Sending all requests to a frontier model with maximum reasoning effort is costly, and the usual demo setup. So the engineer needs to revisit the choice of model, its reasoning effort, and even its deployment type.
1. Choosing a model and reasoning effort
In practice, there are two ways to choose the model. A simple way is to decide ahead of time and hardcode it in your harness code. For example, you can decide to always send classification steps to a cheap model and drafting requests to an expensive model. The reasoning effort is hardcoded the same way.
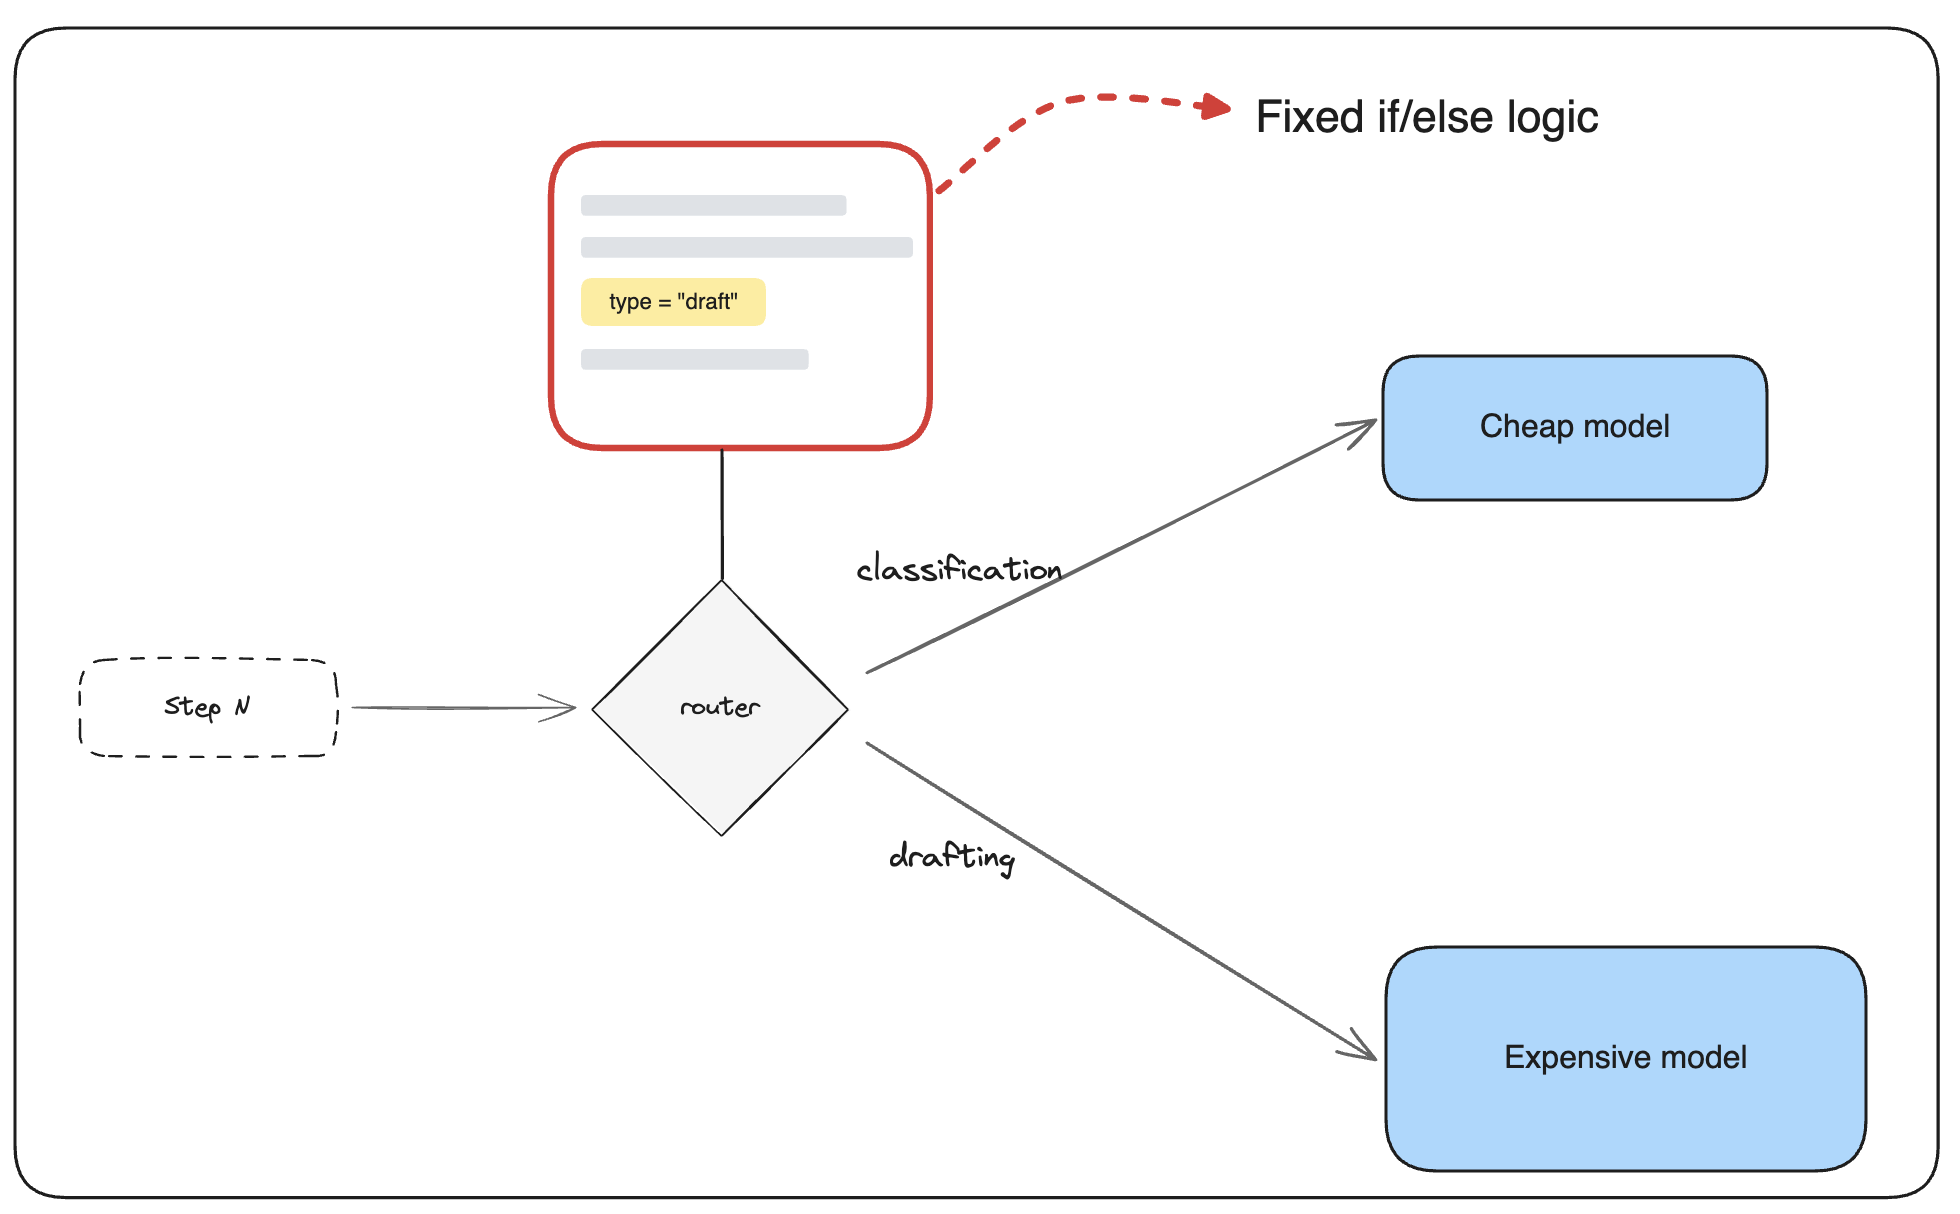
The more systematic way is to decide at runtime. You can build a router that sits in front of the models and decides the choice of models dynamically. The router is mostly focused on classifying the difficulty of the input, so usually a cheap, efficient model is good enough. The router can be also used for governance. For example, you can restrict it to a subset of approved models, so a new model does not unintentionally reach production.
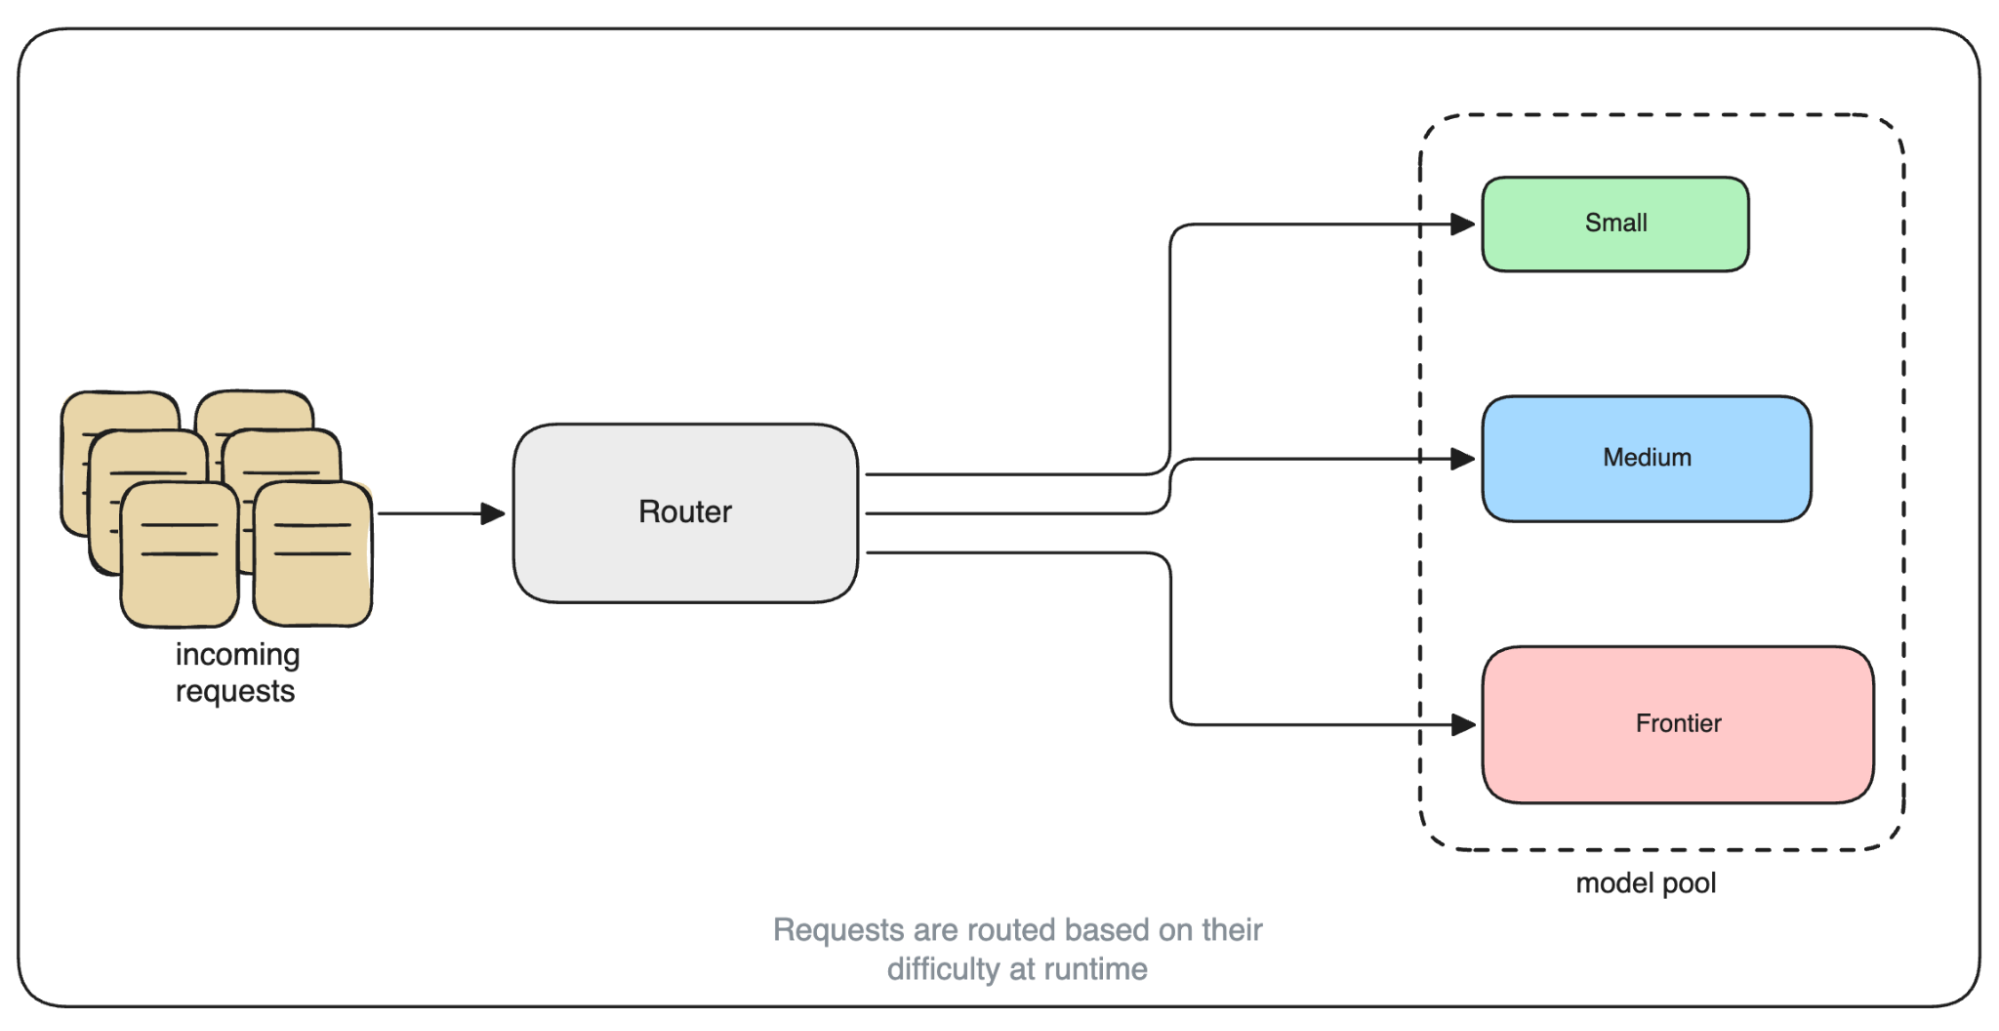
In Azure, Microsoft Foundry provides access to leading AI models for building on Azure[^1]. As you implement your routing logic, you can pick an efficient model. Alternatively, you just pick a model router so you do not have to build the router yourself. Their model router is a small model trained to read a request and decide which larger model should answer it. In addition to that, you can check the spending in a field named reasoning_tokens through an API. This is important for teams to understand how much of the total bill is because of the reasoning tokens.
"usage": {
"completion_tokens": 1843,
"prompt_tokens": 20,
"total_tokens": 1863,
"completion_tokens_details": {
"reasoning_tokens": 448
}
}
2. Choosing a deployment type
In a prototype, you create a minimal deployment, a named endpoint bound to one model. Then your code calls that instead of directly calling the model. In production, a deployment also decides how you are billed or what throughput you can count on.
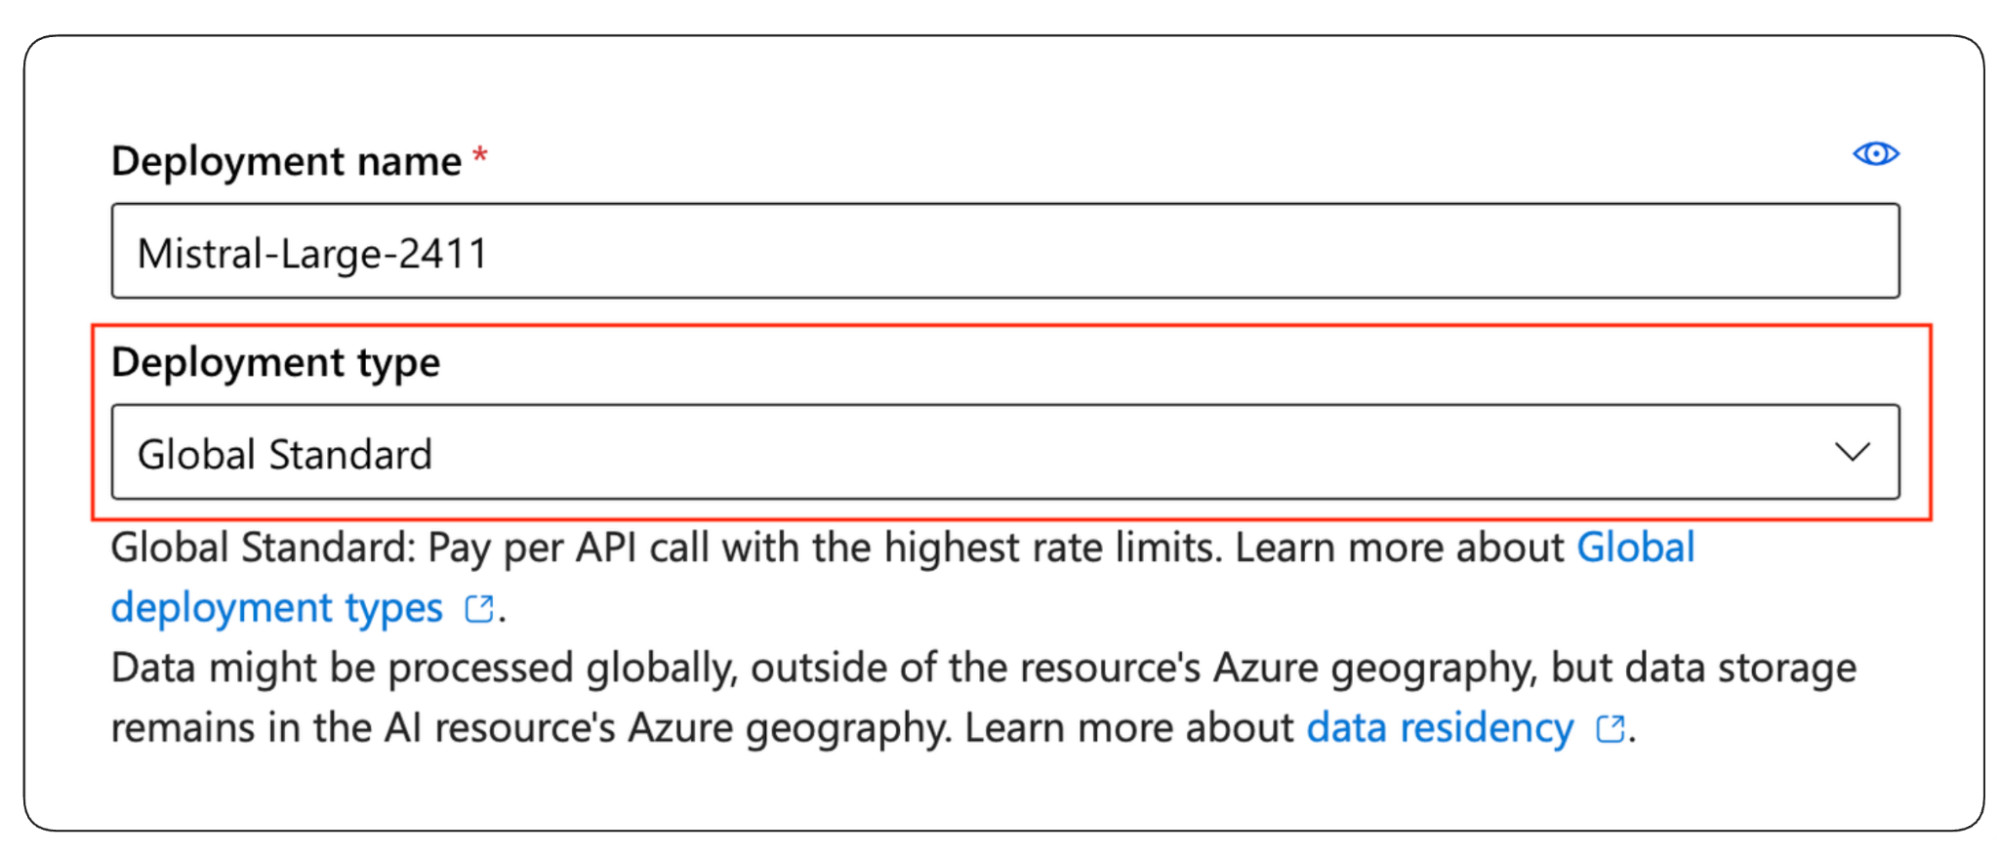
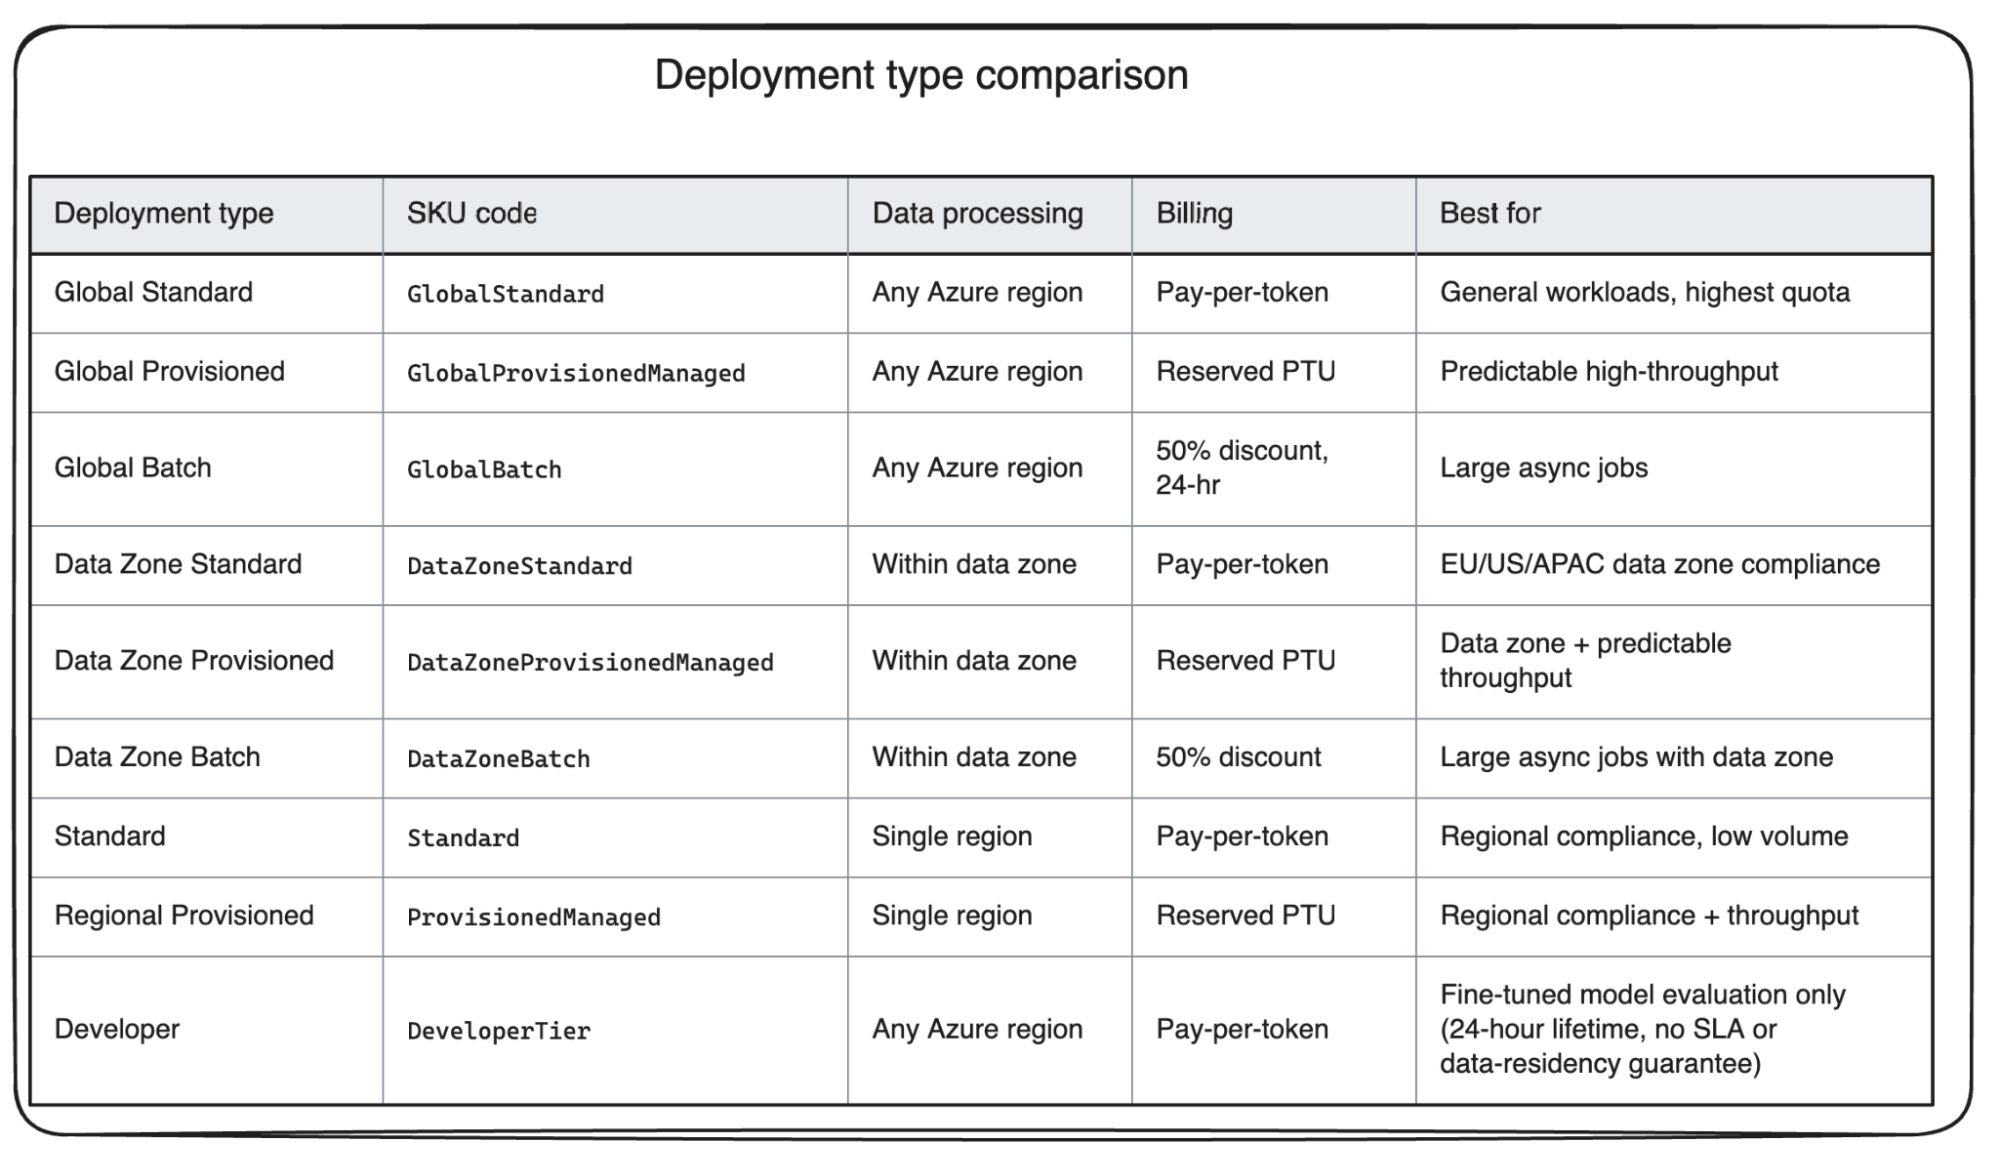
In Azure, there is a setting called the deployment type[^2], with three options: Global, Data Zone, and Regional. Each of them describe where inference runs. Standard, Provisioned, and Batch describe how you pay. For example, Batch runs asynchronously with a 24-hour target and costs less than Global Standard, so it works well for tasks like eval runs or nightly summarization. As shown below, you can easily pick a deployment name, and select your desired deployment type.
Here is a summary of different deployment types offered by Azure. To learn more, visit Deployment types for Microsoft Foundry Models.
Giving Each Agent Its Own Identity
In the prototype, there is often no authentication. In production, you need identities for your agents. Otherwise, you cannot tell which agent did what. There is also no simple way to give one agent less access than another agent. Ideally, you should be able to revoke one agent without any impact on other agents.
But how do teams handle agent identities in practice? Two main techniques: scoped identity, and narrow permissions.
Scoped identity
Does a shared static key solve the problem since it authenticates tool calls? The answer is no. A static key can simply confirm a tool call happened; it cannot attribute that call to a specific agent.
With scoped identity, a software allows agents to authenticate themselves to the platform and receive a token, so all their future activities can be traced back to them.
While you can implement this manually, platforms like Azure allow you to do this easily and reliably. With Azure’s managed identity, you simply enable it on the resource the agent is running on, and then grant that identity access to what it might need.
from openai import OpenAI
from azure.identity import DefaultAzureCredential, get_bearer_token_provider

token_provider = get_bearer_token_provider(
    DefaultAzureCredential(), "https://ai.azure.com/.default"
)

client = OpenAI(
  base_url = "https://YOUR-RESOURCE-NAME.openai.azure.com/openai/v1/",
  api_key=token_provider,
)
This works great for systems with one agent, but one identity is not enough for the whole application if it is running several agents. The fix is to give each agent its own user-assigned managed identity. Unlike an identity tied to a resource, a user-assigned identity is created on its own. This way, you can set it up before the agent exists and also manage it separately. It works as follow:
- You create one user-assigned managed identity per agent.
- You grant each identity only the access that agent needs.
- You assign it to the resource that agent runs on.
That solves problems we pointed out earlier. Each call is attributed to a specific agent. Agents can have different permissions. You can also delete one identity without any impact on the others. With Azure subscription, Managed identities are available at no extra cost.
Narrow permissions
Agents have access to your data and they can execute tools. In practice, we need to ensure they cannot do things that are dangerous. A naive way is to write some rules into the agent's instructions and hope they will work as guardrails. But this will fail easily. An instruction is just text in the prompt. The model still has the capability to do whatever it wants.
To fix that, teams use narrow permissions. They decide ahead of time what the agents should be able to do, and set permissions based on that. That way, even a malicious instruction cannot trick a model into doing something dangerous since the model does not have permission to do it.
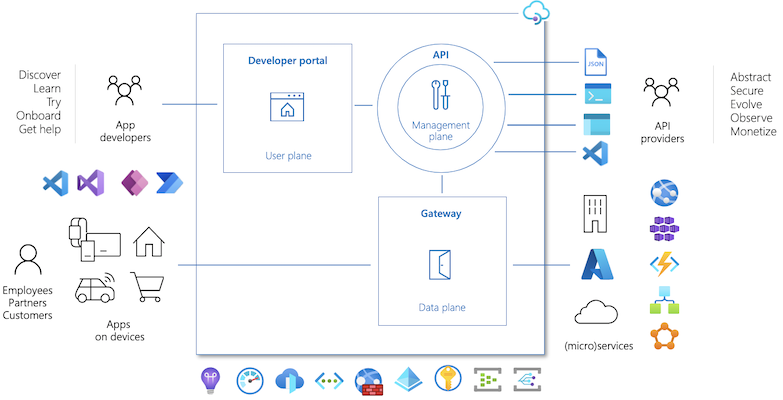
Similar to identity management, Azure gives you that functionality. With the AI gateway in Azure API Management, we can allowlist which tools an agent should be able to reach. Then Microsoft Agent Framework wraps individual tool calls in middleware with an approval gate. In addition to narrow permissions, Azure also has prompt injection detection named Prompt Shields, which looks for injected instructions in retrieved content to prevent them from reaching the model.
Where the Agent Actually Runs
Another key difference between prototype and production agents is where they run. In a prototype, the agent usually runs on a laptop or maybe a single HTTP endpoint that performs the task and returns the results when it's done. This setup works fine in single-user applications, but will quickly fail in production.
So where and how do teams run their agents in practice? Two techniques: 1) asynchronous execution, and 2) durable execution.
1. Asynchronous execution
In prototypes with a single user, you can wait until the user request is complete. There are no other workloads in your system. In production, there might be hundreds of tickets arriving at the same time, each one taking minutes to finish. So we cannot execute requests sequentially and block all other requests.
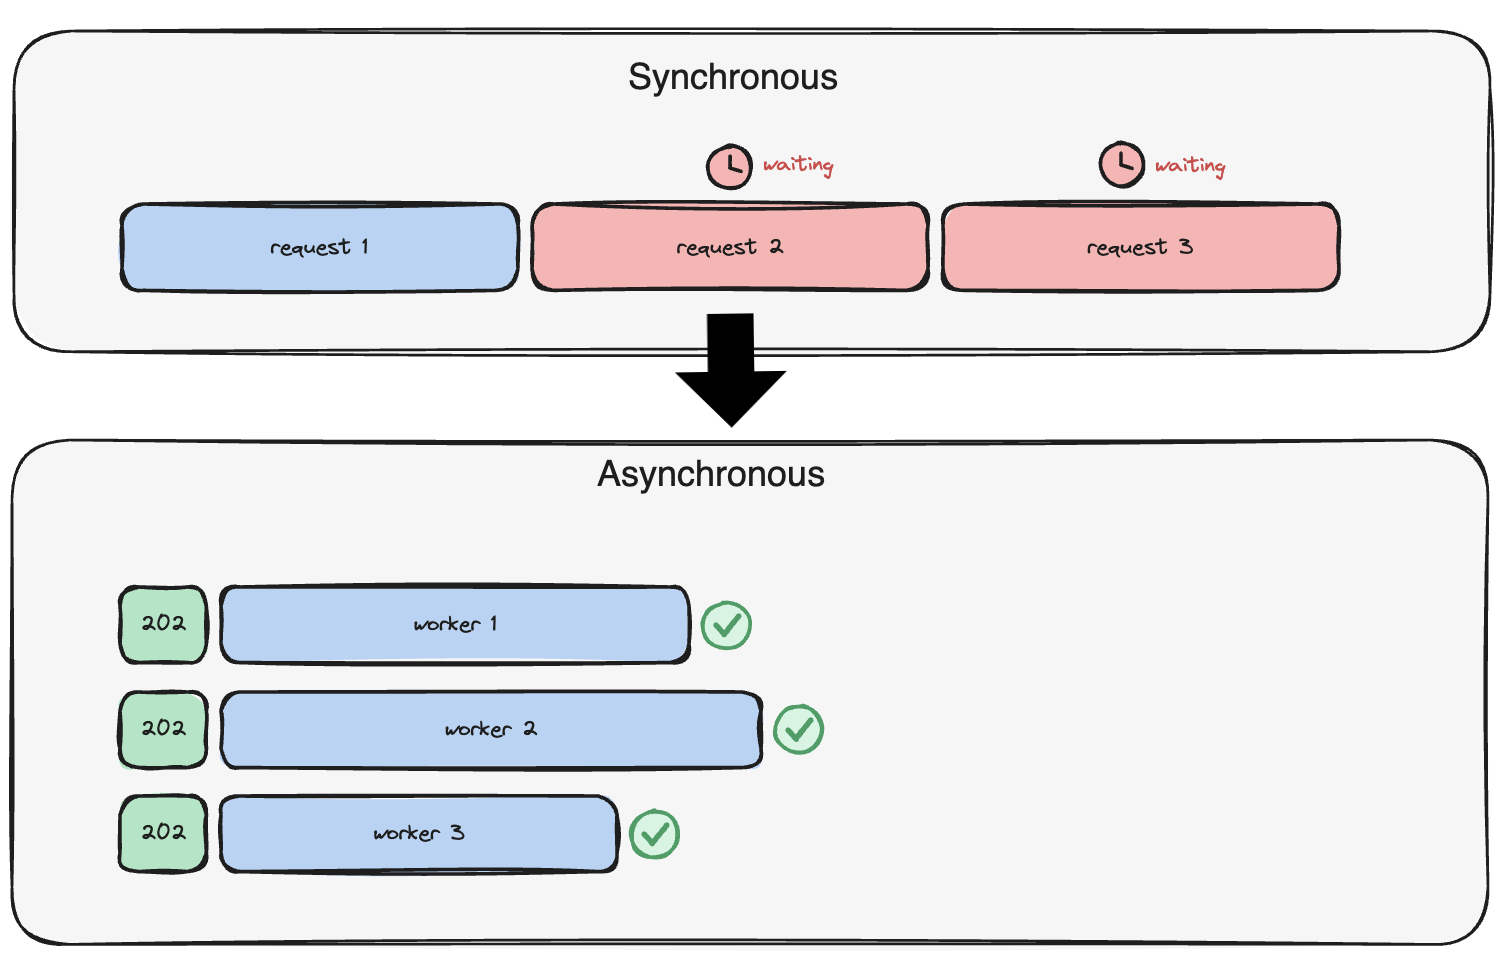
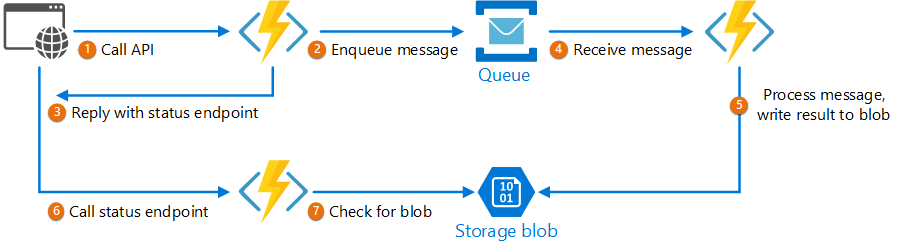
Async execution means the API accepts the work and responds immediately, and runs the actual work in the background. The caller receives an identifier and checks back later for the result. Azure supports async execution with the async request-reply pattern. So when used, the system maintains a queue, and background workers pick tasks from the queue and start the agent loop. The following code shows excerpts from an application that uses Azure Functions to implement this pattern.
2. Durable execution
In a prototype, if a task dies in the middle of the run, it is usually fine. You can run it again. In production, this can be costly. If you restart tasks for many users, the agent has to do a lot of repeated work, which translates to burning more tokens.
The solution to this is a technique called durable execution. The idea behind the durable execution is to record steps as they complete, so if a task gets terminated, the system can rebuild the state and continue from where it stopped.
In Azure, this is called a durable extension for Agent Framework, running on Durable Functions. Multi-step runs are checkpointed automatically. So a run can survive a crash without repeating work it already did.
What the Agent Remembers
When you have a prototype, there is often no explicit memory. The harness simply maintains a list of messages, and each turn, it appends the new results to the list and sends it back to the LLM for the next turn.
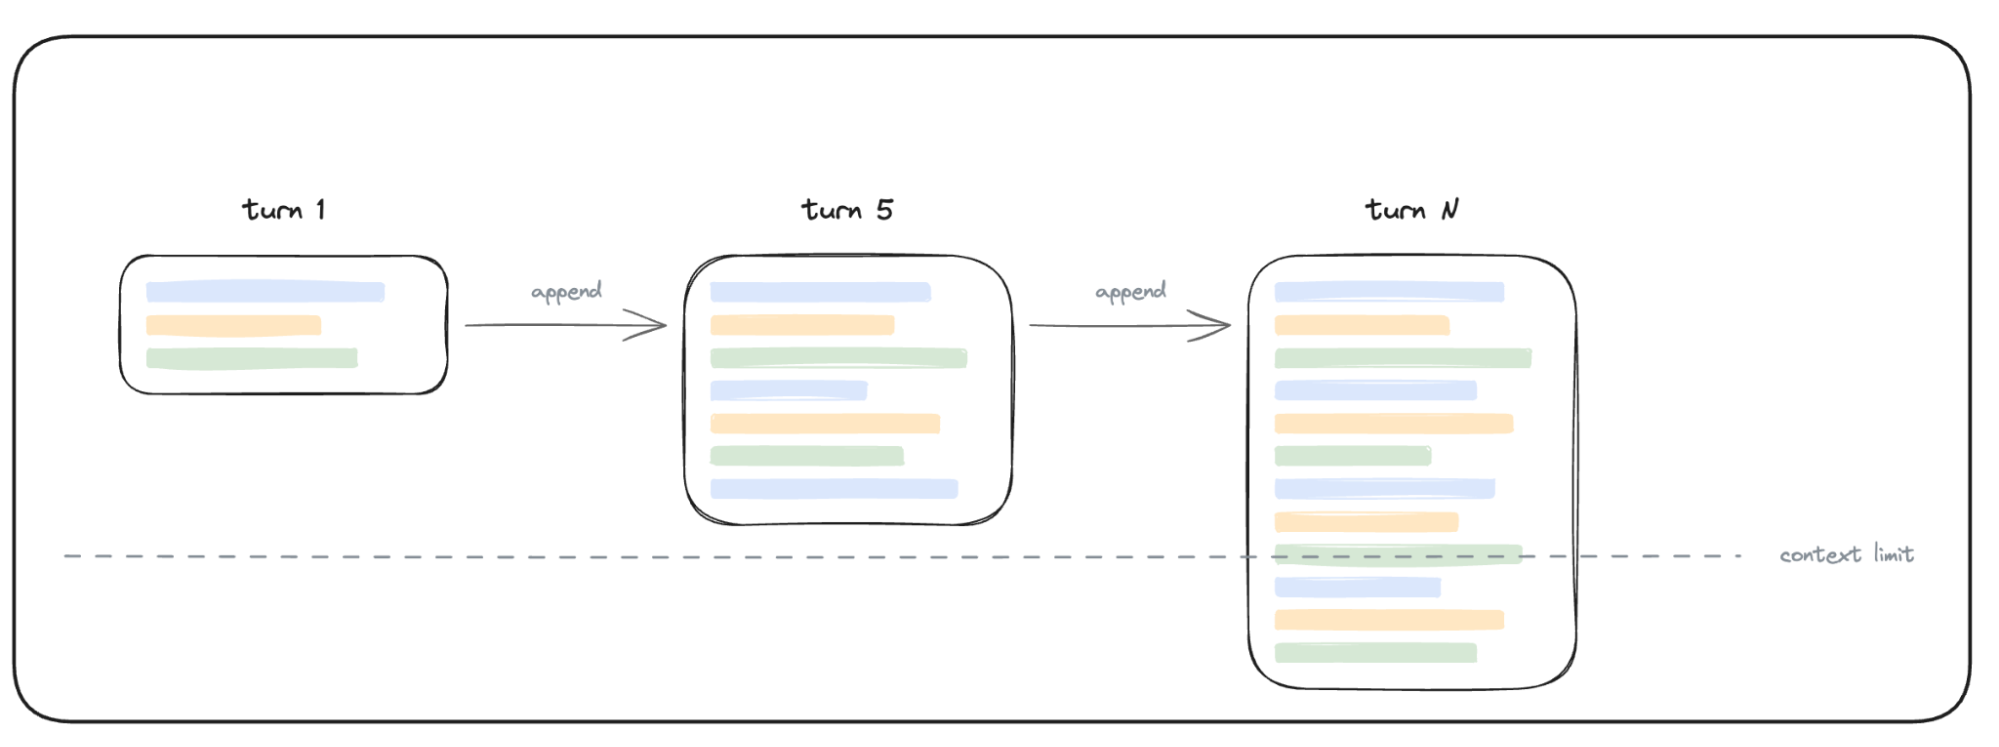
In production, this simple setup will fail. The list keeps growing with each turn. In agentic use-cases, there might be tens or hundreds of tool calls. In between, the user may ask follow-ups. If we maintain a list of all messages and always send the entire conversation history, the context will bloat, and the system will burn a lot of tokens. The LLM will also produce lower quality responses as the context grows. In July 2025, Chroma Research tested 18 models and found accuracy falling around 50% as the context grows.
This is where memory management comes in. In practice, teams often implement a separate component to handle anything related to properly building context. That is, saving the user's long-term preferences somewhere, deciding what to include and what not to include in the context, and compacting the context when it is reaching the LLM context limit.
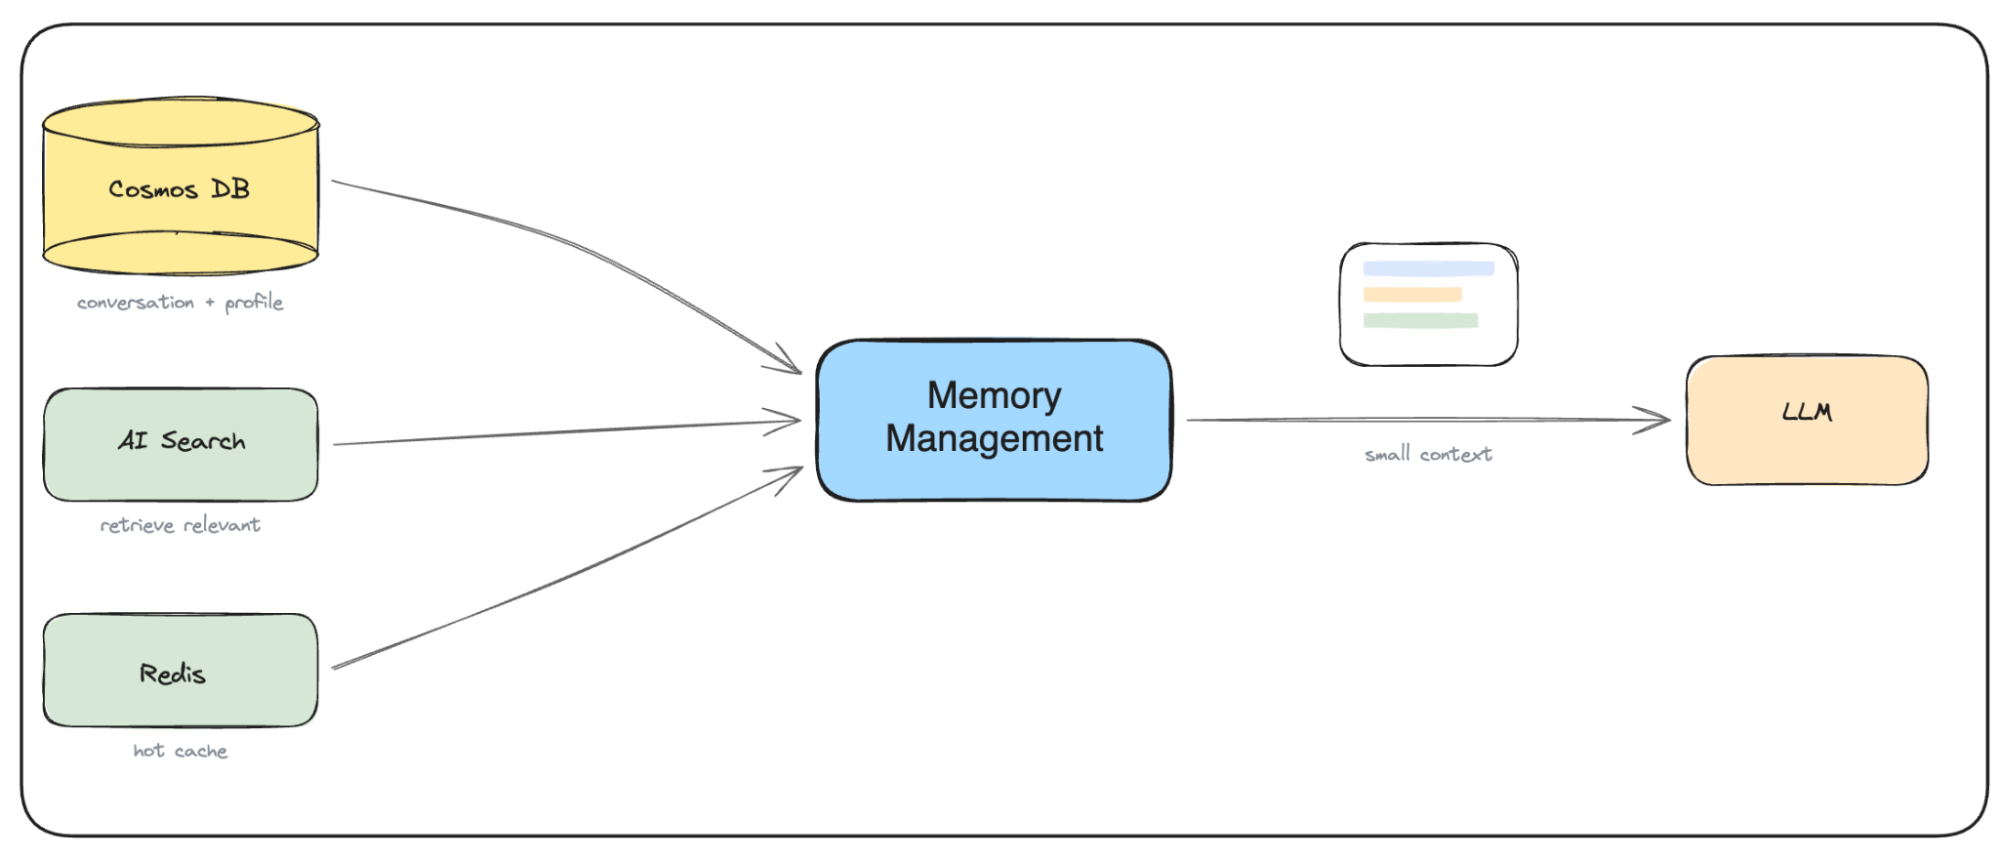
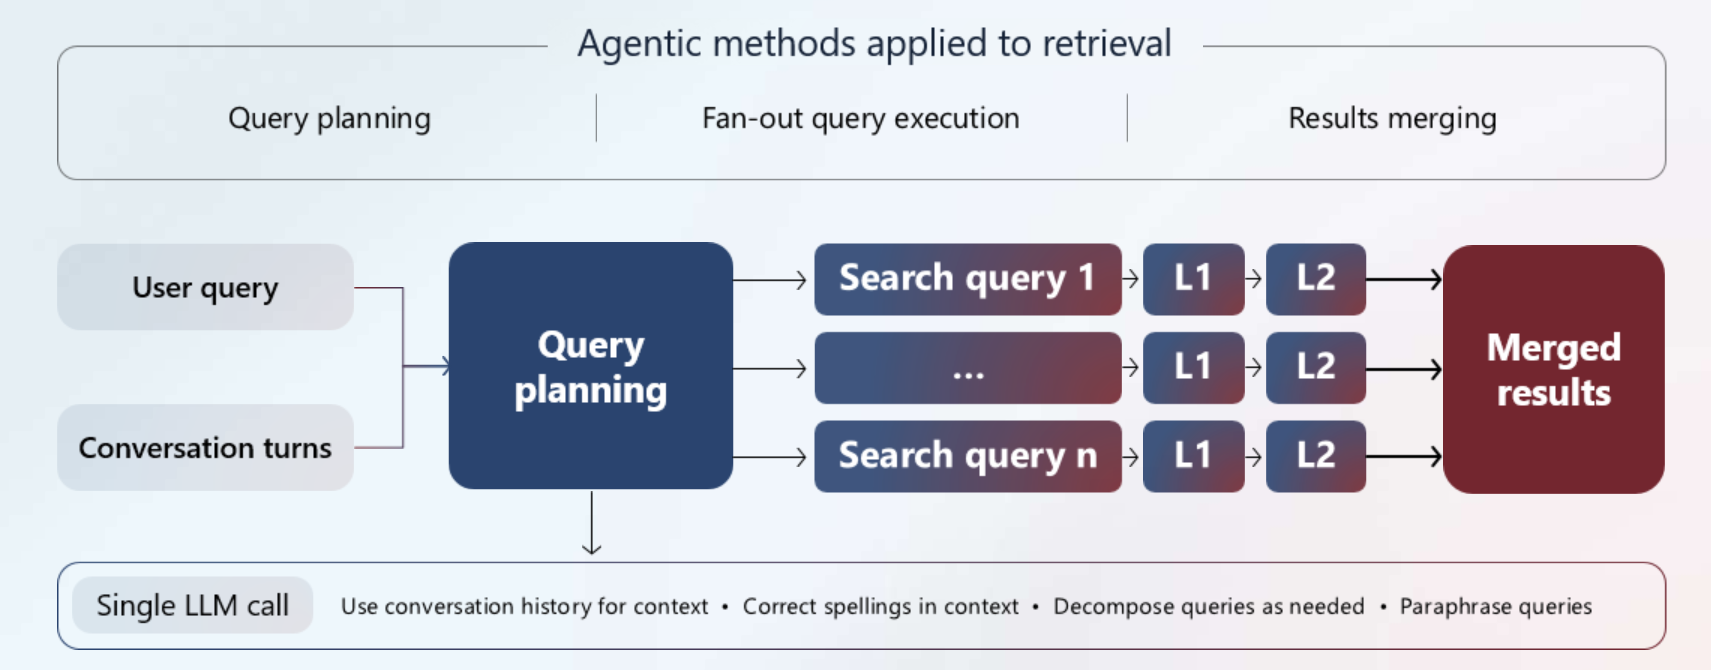
While many teams implement this memory management on their own, platforms like Azure offer a robust set of services so you can reliably build each part of it. For example, Azure Cosmos DB can hold the conversation and what you learn about a customer. In addition to Cosmos DB, Azure AI Search allows you to implement the retrieval part of the memory management, including agentic retrieval. For example, if you have a full markdown file with all the information known about a particular user, you can use hybrid search to retrieve parts of the memory that are relevant to this current turn.
What's Next
Infrastructure has matured quickly over the last year. For example, Azure now supports per-agent and multi-agent identity by default, durable execution as a config so you don't have to implement code, and offers various services so you can easily implement memory management. These are just a few of the many ways platforms like Azure have built services that are reliable, secure, and easy to use, so developers can focus on the most innovative part of their applications instead of repeatedly implementing the same logic. Your architecture can also evolve as models, patterns, and requirements change. For most teams, the fastest way forward is to understand these concepts, follow the patterns that already work, and let the platform handle the repeated work.
Now that you know the concepts, the next step is picking the right services for the agent you're building. Explore what's available on Azure.
[^1]: Refer to https://learn.microsoft.com/en-us/azure/foundry/concepts/foundry-models-overview to learn more about Foundry models.
[^2]: Refer to https://learn.microsoft.com/en-us/azure/foundry/foundry-models/concepts/deployment-types to learn more about Azure deployment types.